Once you’ve assessed your options and chosen the right submeters for your building, you need to install them. Correctly. Incorrectly installed submeters produce incorrect meter reads, and incorrect meter reads lead to incorrect tenant bills, which are a big problem for everyone. So, how can you avoid submeter installation issues?
When using submeters to billback tenants for utilities, it’s imperative that they’re installed correctly before you start using their reads to produce tenant invoices. Whether you’re installing them yourself or have hired a qualified, licensed professional to do the job, it’s important to double check each meter for accuracy. Rule of thumb: If a meter setup doesn’t look right, it probably isn’t!
Mind Your Phases
Meters use sensors called CTs (current transformers) to measure the amperage in one or more conductors. In the context of an electrical system, a phase represents one line of power. Most electrical panels use multiple phases to power their breakers. Additionally, each distinct phase powers several breakers in the panel.
When metering and calculating the power of a circuit, you must multiply the breaker current of a given phase by the voltage of that same phase. If you multiply by the wrong phase in your calculation, your meter reads will be incorrect. The CTs must be in phase with the voltage reference.
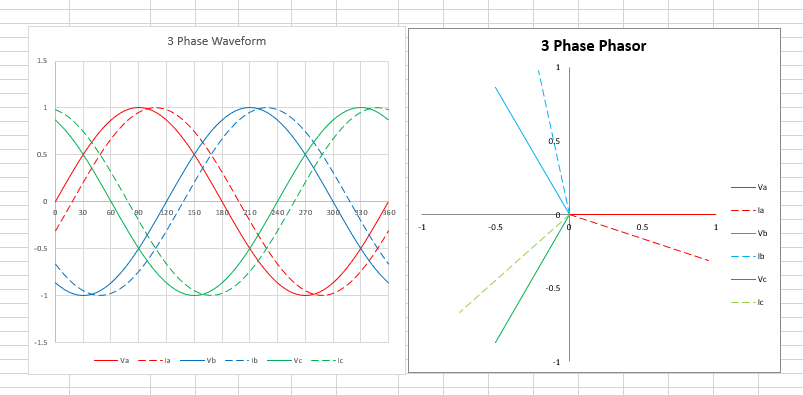
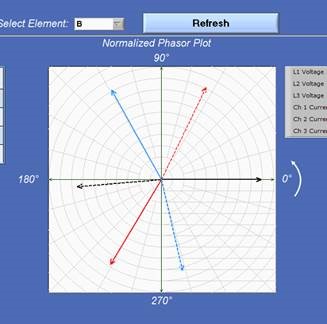
TIP: Phasor diagrams (below) are a life saver when commissioning meters. Check out your meter installation instructions to see if these diagrams have been provided.
Get Your CTs on Straight
If your CT is mounted backwards, the meter won’t produce accurate reads. Look closely before placing your CT — an indicator on the CT tells you the proper orientation.
Match Your CTs and Voltage References Correctly
This one is crucial. If any CT is not on the right phase, the meter will not calculate correctly. L1 CT, for example, must be on L1, the meter won’t be able to take accurate reads until it is.
Be careful! Below, L1 on one panel may not be the same in the same position as L1 on a different panel.
Here’s why this matters when trying to avoid submeter installation issues. For a meter to calculate power, it uses this formula: kW = Volts x Amps x Power Factor. The power factor comes from the phase angle between the voltage and current. Therefore, if the CTs and phases are incorrect, the power factor will be incorrect, and the calculation will be entirely wrong.
The phasor diagram below shows correct voltage and current — the CTs are on the correct phase.
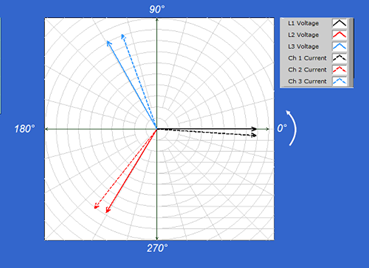
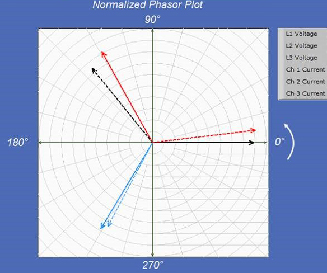
With a correctly placed CT, this kW calculation comes out to 5.1. But had the incorrect mounting occurred, resulting in an incorrect power factor, the kW calculation would come out to -0.05 (diagram shown below). Since kW is used to calculate tenant responsibility for utilities, incorrect kW calculations will result in either over or under billing — both of which lead to major problems.
A CT mounted backwards:
And here with two CTs swapped:
When installing submeters in your building, remember that all meters are essentially calculators — they won’t give you the right calculation unless the right information is entered. Even a seemingly small installation mistake can have very costly consequences.
Label, Label, Label!
Proper installation means nothing without communicating how to calculate correct usage to those who need that information. Properly labeling the meter during installation will ensure transmission of complete and accurate information.
Label each meter with its correct multiplier (more to come on these in a future blog). Whether the meter has no multiplier (x1) or a multiplier of x2, x80, etc., make sure to place an easily visible label on the meter.
It’s also important to label what a meter is monitoring specifically, any relationships between meters (i.e. if the meter is a submeter to another, or sub feeds a different meter), and the date of meter install (so that the meter can start being utilized for billing).
By documenting all of this information on each meter, you help ensure proper billings from day one.
Double Check Everything!
Once you’ve installed your meters with all of the above in mind, do yourself and your tenants a favor: Double check it all! Using submeters for billing purposes requires an extra level of conscientiousness and attention to detail. It’s worth taking an extra few minutes after installation to make sure that each meter is setup and running correctly, to prevent over/under billing tenants.
For more information on how you can elevate your building’s submeter reading and billing process, check out Genea’s Submeter Billing software. Genea can help you prevent submeter installation issues that cause inaccurate reads. To learn more about our service, request a demo below.